
How to form your first bonsai forest in 8 steps
I love forests, they evoke so many feelings… Imagine having your own forest in your garden or terrace! But… you don’t know how to start? Well, here I tell you how to make your first bonsai forest in 8 steps, with simple trees and in a practical way. Follow these steps and you will start enjoying the magic of the forests.
The forest style or Yose-ue (in Japanese), is a rather complicated style, due to the amount of artistic principles that must be followed. In addition, you have to choose well which and how many bonsais will form it. If there are few trees, I suggest that they be odd numbers, 3, 5,7,11,13, and then, from 13, you can put as many trees as you want. According to the Japanese, even numbers give bad luck.
Although this is one of the most difficult styles, we can start with a simple forest, with few elements, so that you could develop a taste for working bonsai forests. The trees we will use are small Zelkovas; Simple, but very beautiful and delicate trees.
WHAT WE NEED :
For your first forest you should have the following tools on hand:
- The landscape pot you have chosen (usually very wide and shallow).
- Wires to fix the bonsais.
- Mesh(es) for the drainage hole(s).
- Substrate (we will use a mixture of Akadama and Terrabonsai).
- The bonsais that will compose our forest. In our case we will use Zelkovas bonsai or elms (Shohin[1]).
- Moss to decorate.
- Repotting tools: bamboo sticks, a rake / spatula to untangle the roots, and wire cutting scissors.
STEPS TO FOLLOW:
1. First of all, we will prepare the meshes for the drainage holes of the pot.
We will place them in a way that ensures that the substrate does not come out, as we do with all our bonsais. Normally the meshes are plastic meshes cut in square, of different sizes; they serve to prevent the substrate from leaking out while letting water pass through. What we do is using a wire to fix the mesh to the drain hole, as I show you in this sequence of images.


2. Next, we will place a guiding wire.
This wire will serve to anchor the different trees that will form our forest. To do so, we take a thick wire (4 or 4.5 mm). We place and fix it well along the pot, from the two farthest holes. On that guiding wire, we perpendicularly tie smaller and longer wires that will be those that anchor the trees, as I show you in the photo.


3. Once we have the wires ready, we put a first layer of substrate in the pot.
Just above this layer we can place a chelate[2], I prefer charcoal or from bamboo. The Chelate has three functions, maintaining the neutral pH of the substrate, favouring roots aeration and sustaining the formation of mycorrhizae. Charcoal can be bought in grocery stores, here in Mistral Bonsai, we have bamboo coal.

4. Let’s get to work with the trees !
We put the main tree first. We clean the roots a little with the rake, taking care not to break them, fix the tree and wire it with the perpendicular strips of aluminium wire that we had previously prepared. The main tree can be the thickest, the tallest or the prettiest. Around it we are going to locate the other trees to elaborate our design.

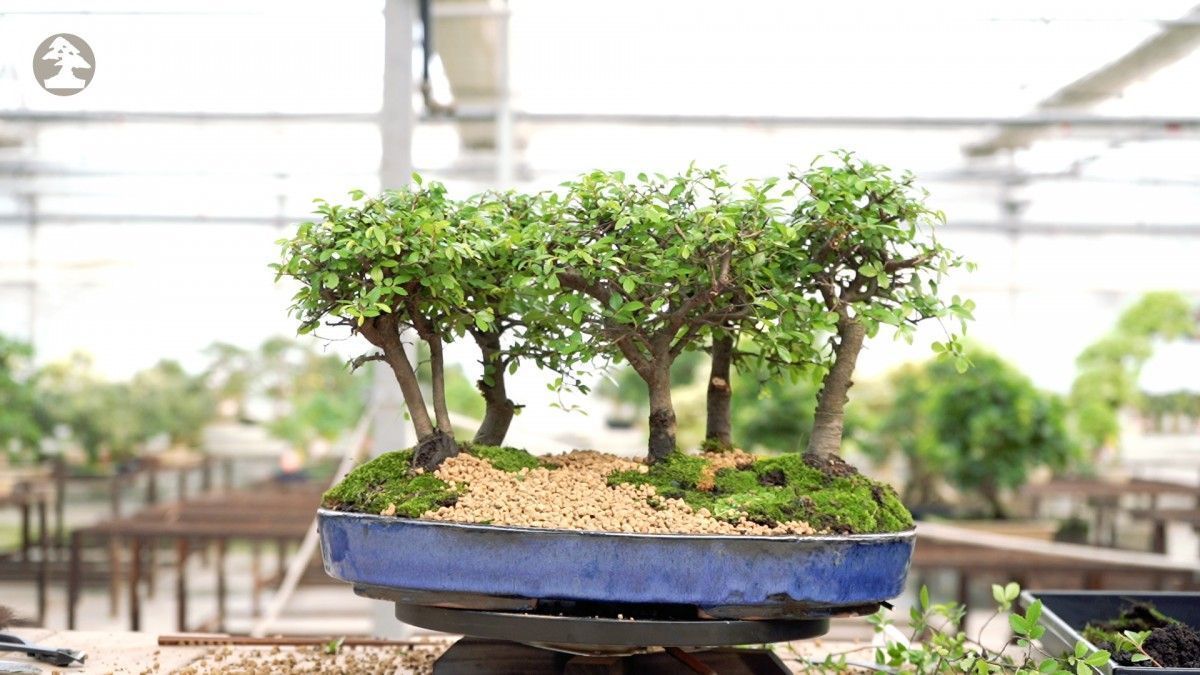
As it is your first forest, we will make a simple design, a forest with a linear movement. Here, the main tree was the prettiest, with a finer branching. We have placed it slightly to the right, off-center, and we plan to place a group of 3 trees on the right and 2 trees on the left. There we are creating an imaginary path between the two groups of trees. Our forest will have 5 trees.

5. Arrangement of the bonsais.
We will place the rest of the trees, taking into account that the distances between them must be irregular. We must also try not to have any tree covering another, and to keep empty spaces well defined, like in any natural forest.

6. We will finish adding substrate in the holes.
And with a stick we introduce the substrate through the roots of the trees.
 in the holes.")
7. We outline the silhouettes of the trees and the forest in general, with scissors.
In principle the silhouette is not defined at all, since they are young bonsai. What we want is to let our main tree grow taller than the others, so that the silhouette looks irregular and more dynamic.

8. At the end, the moss.
We place moss in order to decorate as well as to prevent the substrate from leaving the pot when watering. Moss gives a more natural look to forests. Remember not to entirely cover the substrate with moss, arrange pieces to make it look more real.


Now you already can enjoy a simple forest, made with young bonsais, which will mature with you, and you will be able to admire the changes that time will generate in your forest.
Let’s go for a walk in the woods…
Until next time.
[1] Shohin = Japanese term to name bonsai that are less than 21 cm
[2] A chelate is a substance that prevents metal ions from binding to form salts. Bamboo or charcoal fulfils that function, this prevents the formation of salts in the soil and thus maintains its neutral PH.
You may also be interested in…
About the Author
Luis Alejandro Herrera
Spreading the art of bonsai is his passion. As a reference in the Latin American bonsai world, Luis studied and participated as an instructor for more than 15 years within the Venezuelan Bonsai Society. He had the opportunity to expand his knowledge with great masters from the world of bonsai like Pedro Morales, Nacho Marín; and within the European school with the Italian teacher Salvatore Liporace. He managed to be in the first place of the Caracas 2016 New Talents Contest and successfully completed the master class of the European School of Bonsai in Puerto Rico. During his career he has been a permanent instructor of the Venezuelan Society of Bonsai.
Categories
Bonsai cultivation and care (54)
Bonsai gift (2)
Bonsai pests and diseases (6)
Bonsai repotting (3)
bonsai substrates (2)
bonsai tools (1)
Bonsai work (10)
Ceramic pots (3)
Chinese culture (1)
Chinese culture (2)
Corporative Mistral Bonsai (8)
Cuidados del bonsái (22)
Cultivo del bonsái (20)
Dead wood (2)